FACT SHEET (FS-1202) - Downloding Images from Digital Camera
This new Fact Sheet is now available to members of the Email Photographers Network. You can have a copy by sending me an email and joining the Email Network.

A preview of content contains the following.
- Install on your computer the software that came with
your digital camera.
- Connect your camera to your computer using the USB cable that came with your camera You must have a USB port to download images / pictures to your computer (or place card into card reader)
- Choose the folder where you want your images
downloaded. The computer will choose the "My Images" folder by default unless you want them in a different folder.
- Preview the images. You can delete any you don't like or
want. Make sure to delete them off your camera as well or the next time you download that image will
downloaded again.
The Topics covered are:
USING CAMERA USB CABLE— (This will be provided with your camera) when purchased)
USING COMPUTER CARD READER— This make come with your computer (or can be fitted) or you may need to purchase a USB connect Card Reader.
WHY CAN I NOT CHOOSE SOME OF MY IMAGES when using File Explorer to Download Images from your Camera or Card?
TAG IMAGES SO THEY ARE EASIER TO FIND using Windows File Explorer
VIEW AND ORGANISE YOUR IMAGES using Windows 7 Pictures Library (and other Folders)
USE THE FOLLOWING TIPS to help you VIEW YOUR IMAGES your way.
Initially it might be daunting, but use will give you experience and confidence. Windows 7 File Explorer has been used as most of you will have access to this system. Apologies to others.
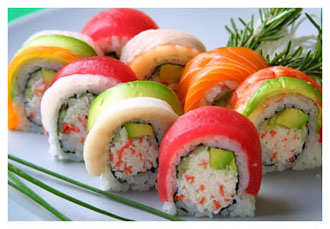
Five tips to good food photography
A few people have asked about food photography. How do you create mouth-watering images? How do you get the food to jump out and make you want to take a bite? Here are five tips to help.
Rule 1: Use A Photo Studio Of Some Kind
You don’t need to have an entire room in your house dedicated to food photography, but you will need a studio space of some kind. If you can get a big table where you can place the food and extra props, you’ll have an advantage. You’re also going to need lights and light stands or tripods. As I will point out later, these light sources are going to be small, but you will still need space for them.
Rule 2: Arrange Your Food Artistically
You need to map out the image in your head before you bring out your camera. Try to think of things you can add to the dish that will give it some extra color. Use complimentary or similar colored items as well as items that give extra texture to the shot like the bread above. Add extra garnishes and flourishes to make your dish come alive. Nobody wants to look at dry potatoes and a whole lot of whitespace.
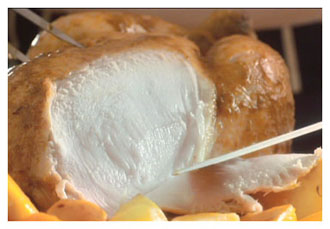
Rule 3: Don’t Place Big Bright Lights Near Your Food
The key to getting great pictures of food is all in the lighting. You want your viewer to get a real sense of the food’s texture. You want just enough light to see the little shadows in between the nooks and crannies of your food. When you use adequate lights (bounced flash) or reflected light, it removes the shadows that give your food character and texture.
Mount your camera on a tripod, and use slower shutter speeds. You will need to do this because there will be low light brightness, and you will want more control over the way you frame your image.
Rule 4: Never Light Your Food From The Front
When you place lights directly in front of the food (or next to the camera), it erases the shadows and destroys the texture. Side lighting is a key element.
Rule 5: Emulate What You See In Magazines
Professional food photographers spend hours upon hours just tinkering with the light and styling the food. The tips above only scratch the surface of the lengths the pros go to make food look appetizing.
We will look at some food images at the Seminar on Thursday night. You are always welcome to bring some of your own images and share them with the Seminar and Newsletter groups.. Enjoy your photography.