Editing images Using Lightroom 5.
The Last review of image editing software is Lightroom 5.
Adobe Lightroom is often referred to as the 'alternative Photoshop', but in truth this powerful photo editing software is much more than a budget alternative. Adobe Lightroom actually offers photographers a sophisticated photo editing software that combines image cataloguing, Raw conversion and non-destructive editing.
Imagine a software where you can organise your photos, search for images and create themed Collections, web albums and slideshows. Lightroom also incorporates the non-destructive editing tools including dynamic range/tonal adjustments, curves, sophisticated colour controls, localised adjustments and more.
These tools are organised into a simpler, more efficient and streamlined user interface – and they work on JPEGs and TIFFs, too, so that all your file formats are integrated into the same workflow. The key point about Adobe Lightroom is that all your adjustments are
non-destructive and stored within the Lightroom catalog.
You can apply a colour adjustment to an image, for example, and come back weeks later to change it – the sliders will be exactly where you left them.
Adobe Lightroom also supports Photoshop 'round-tripping'. You can open an image in Photoshop from within Lightroom, make your changes and save the image, and the edited version will automatically appear alongside the original in your Lightroom catalog.
Adobe Lightroom is not a Photoshop replacement but a complementary aid to Photoshop or whatever other image editing software you prefer to use. There are certainly added integration benefits if you use Lightroom 5 with Photoshop, Photoshop Elements or GIMP Getting to know the Adobe Lightroom interface:
At first use, the Adobe Lightroom interface can be a little daunting, but it all breaks down into manageable chunks with constant usage.
Adobe Lightroom 5 will give you all the usual editing functions available in the other software as we have discussed in previous newsletters with the addition of the following image management functions. These functions will give you a professional approach to how you organise and manage your collection of images.

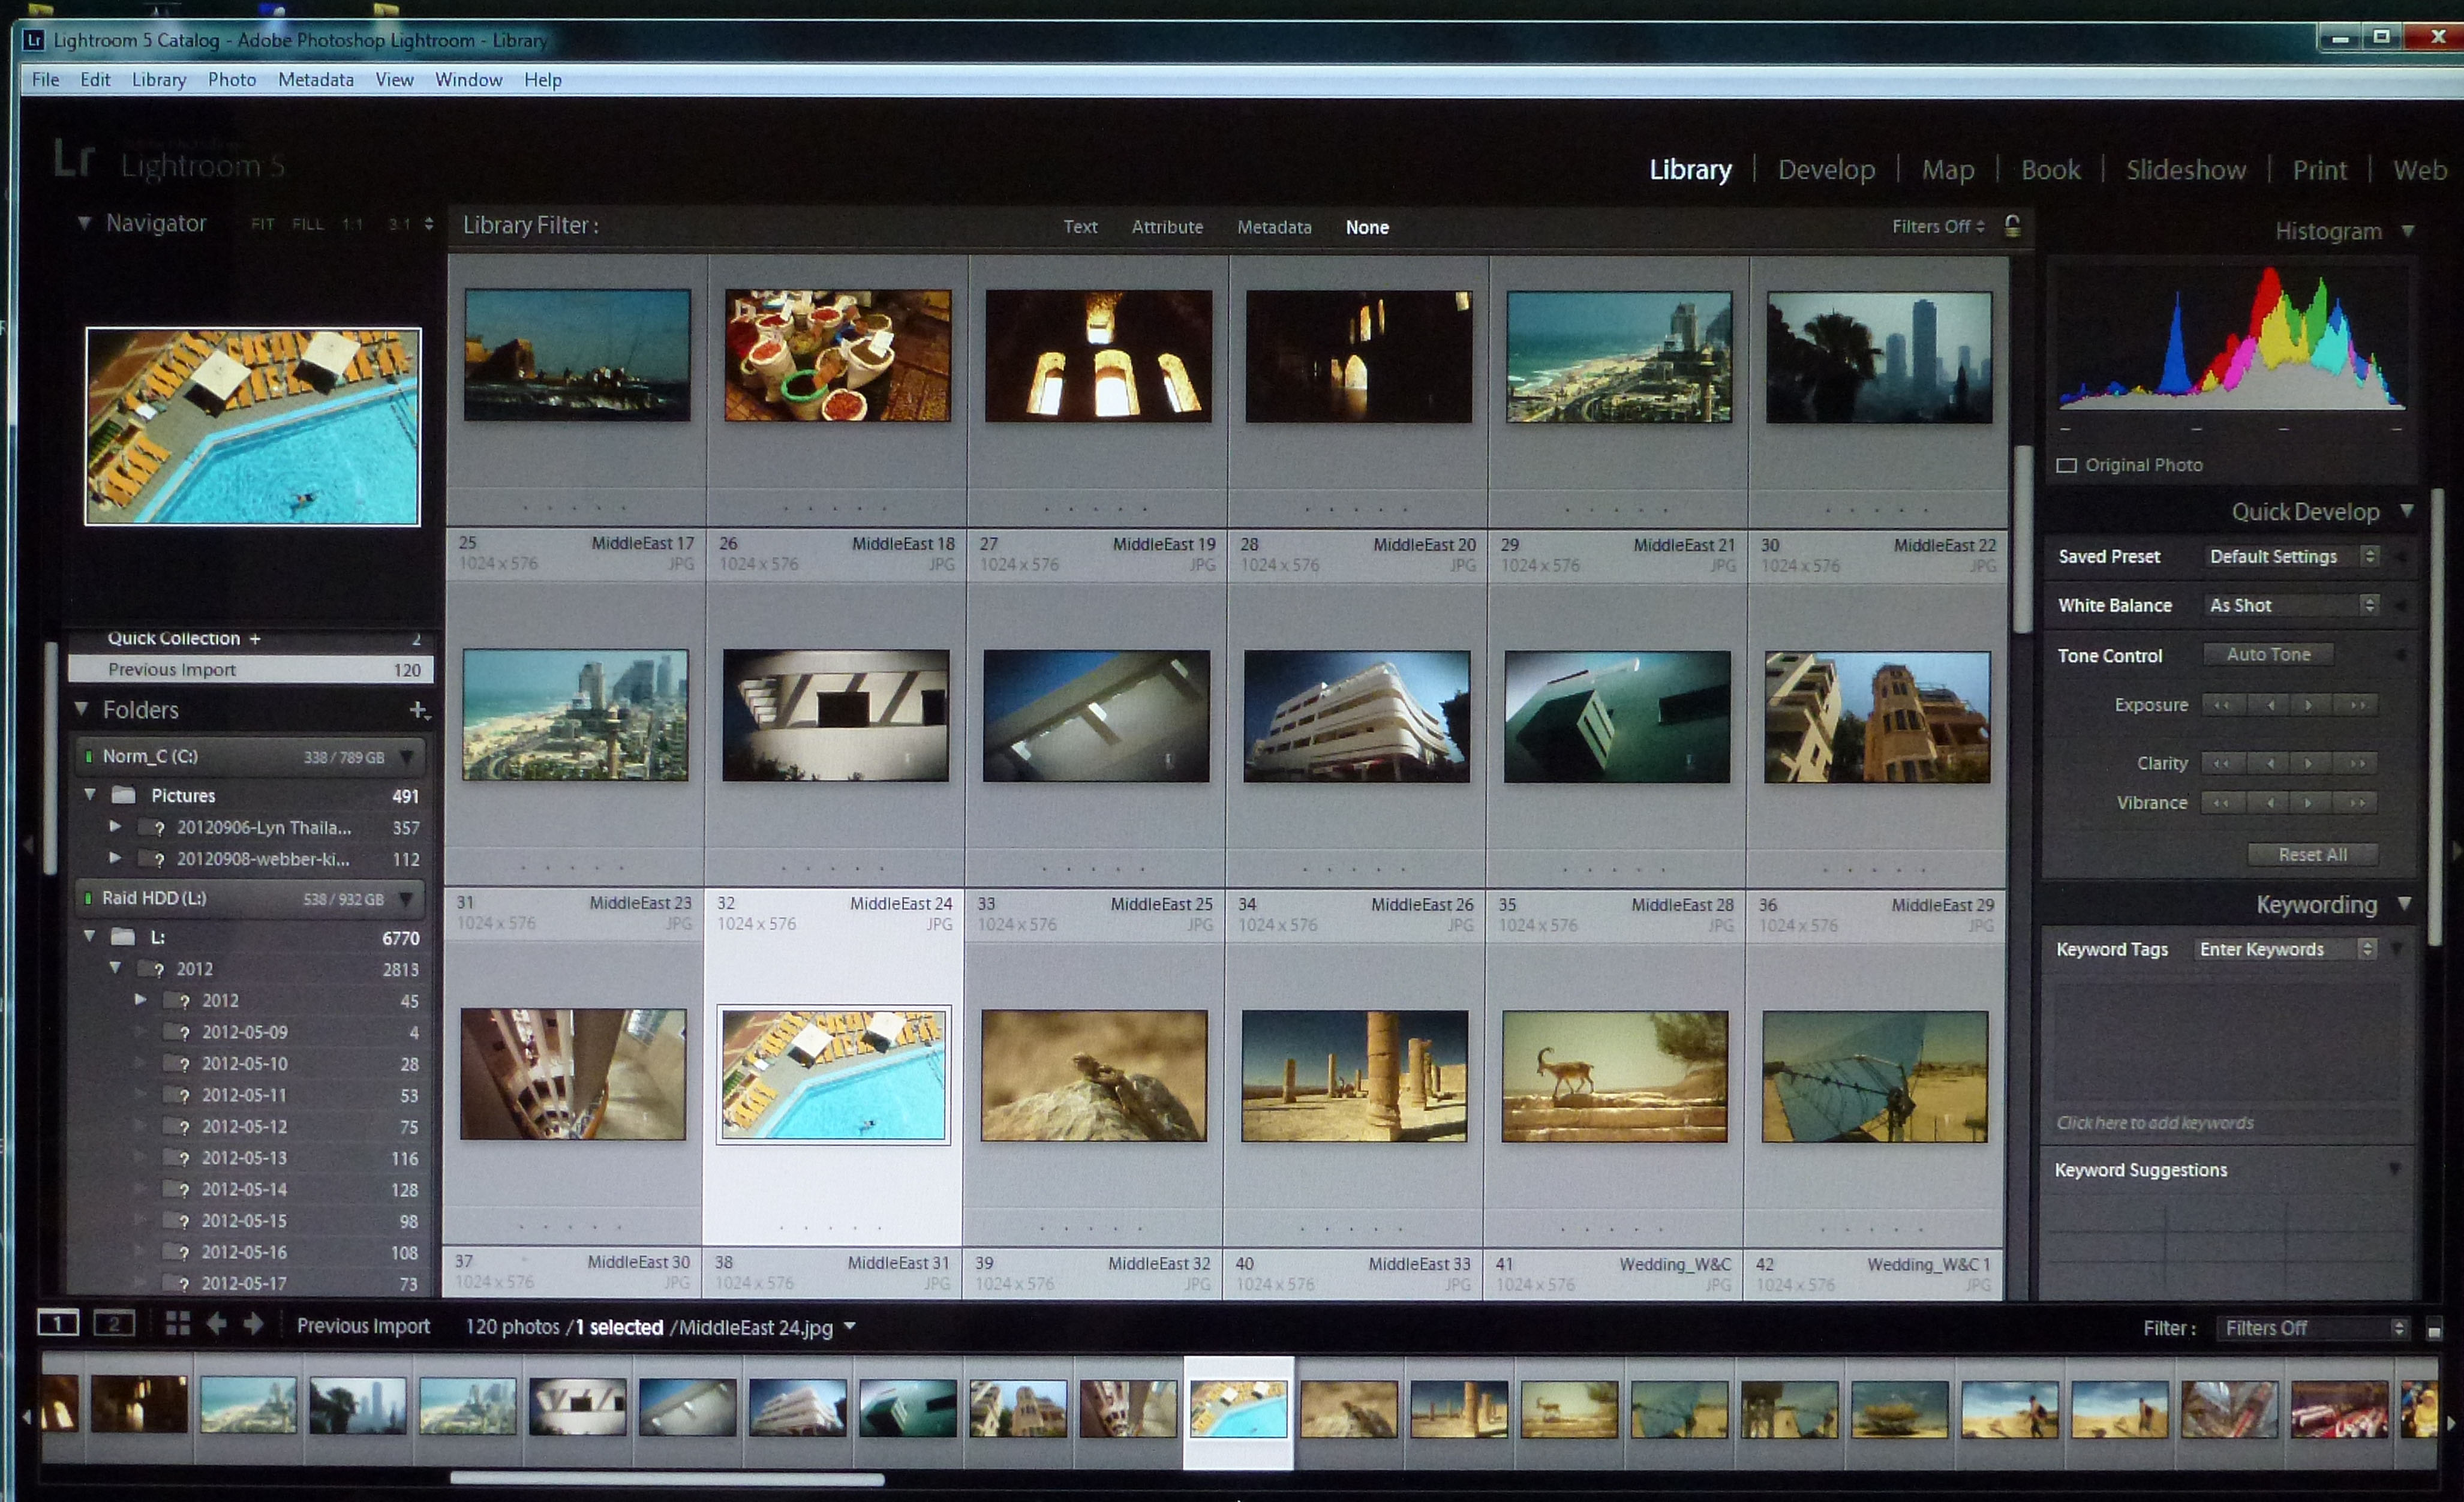
(click the image for a larger version of the Interface detail in basic library (import/ catalogue mode)
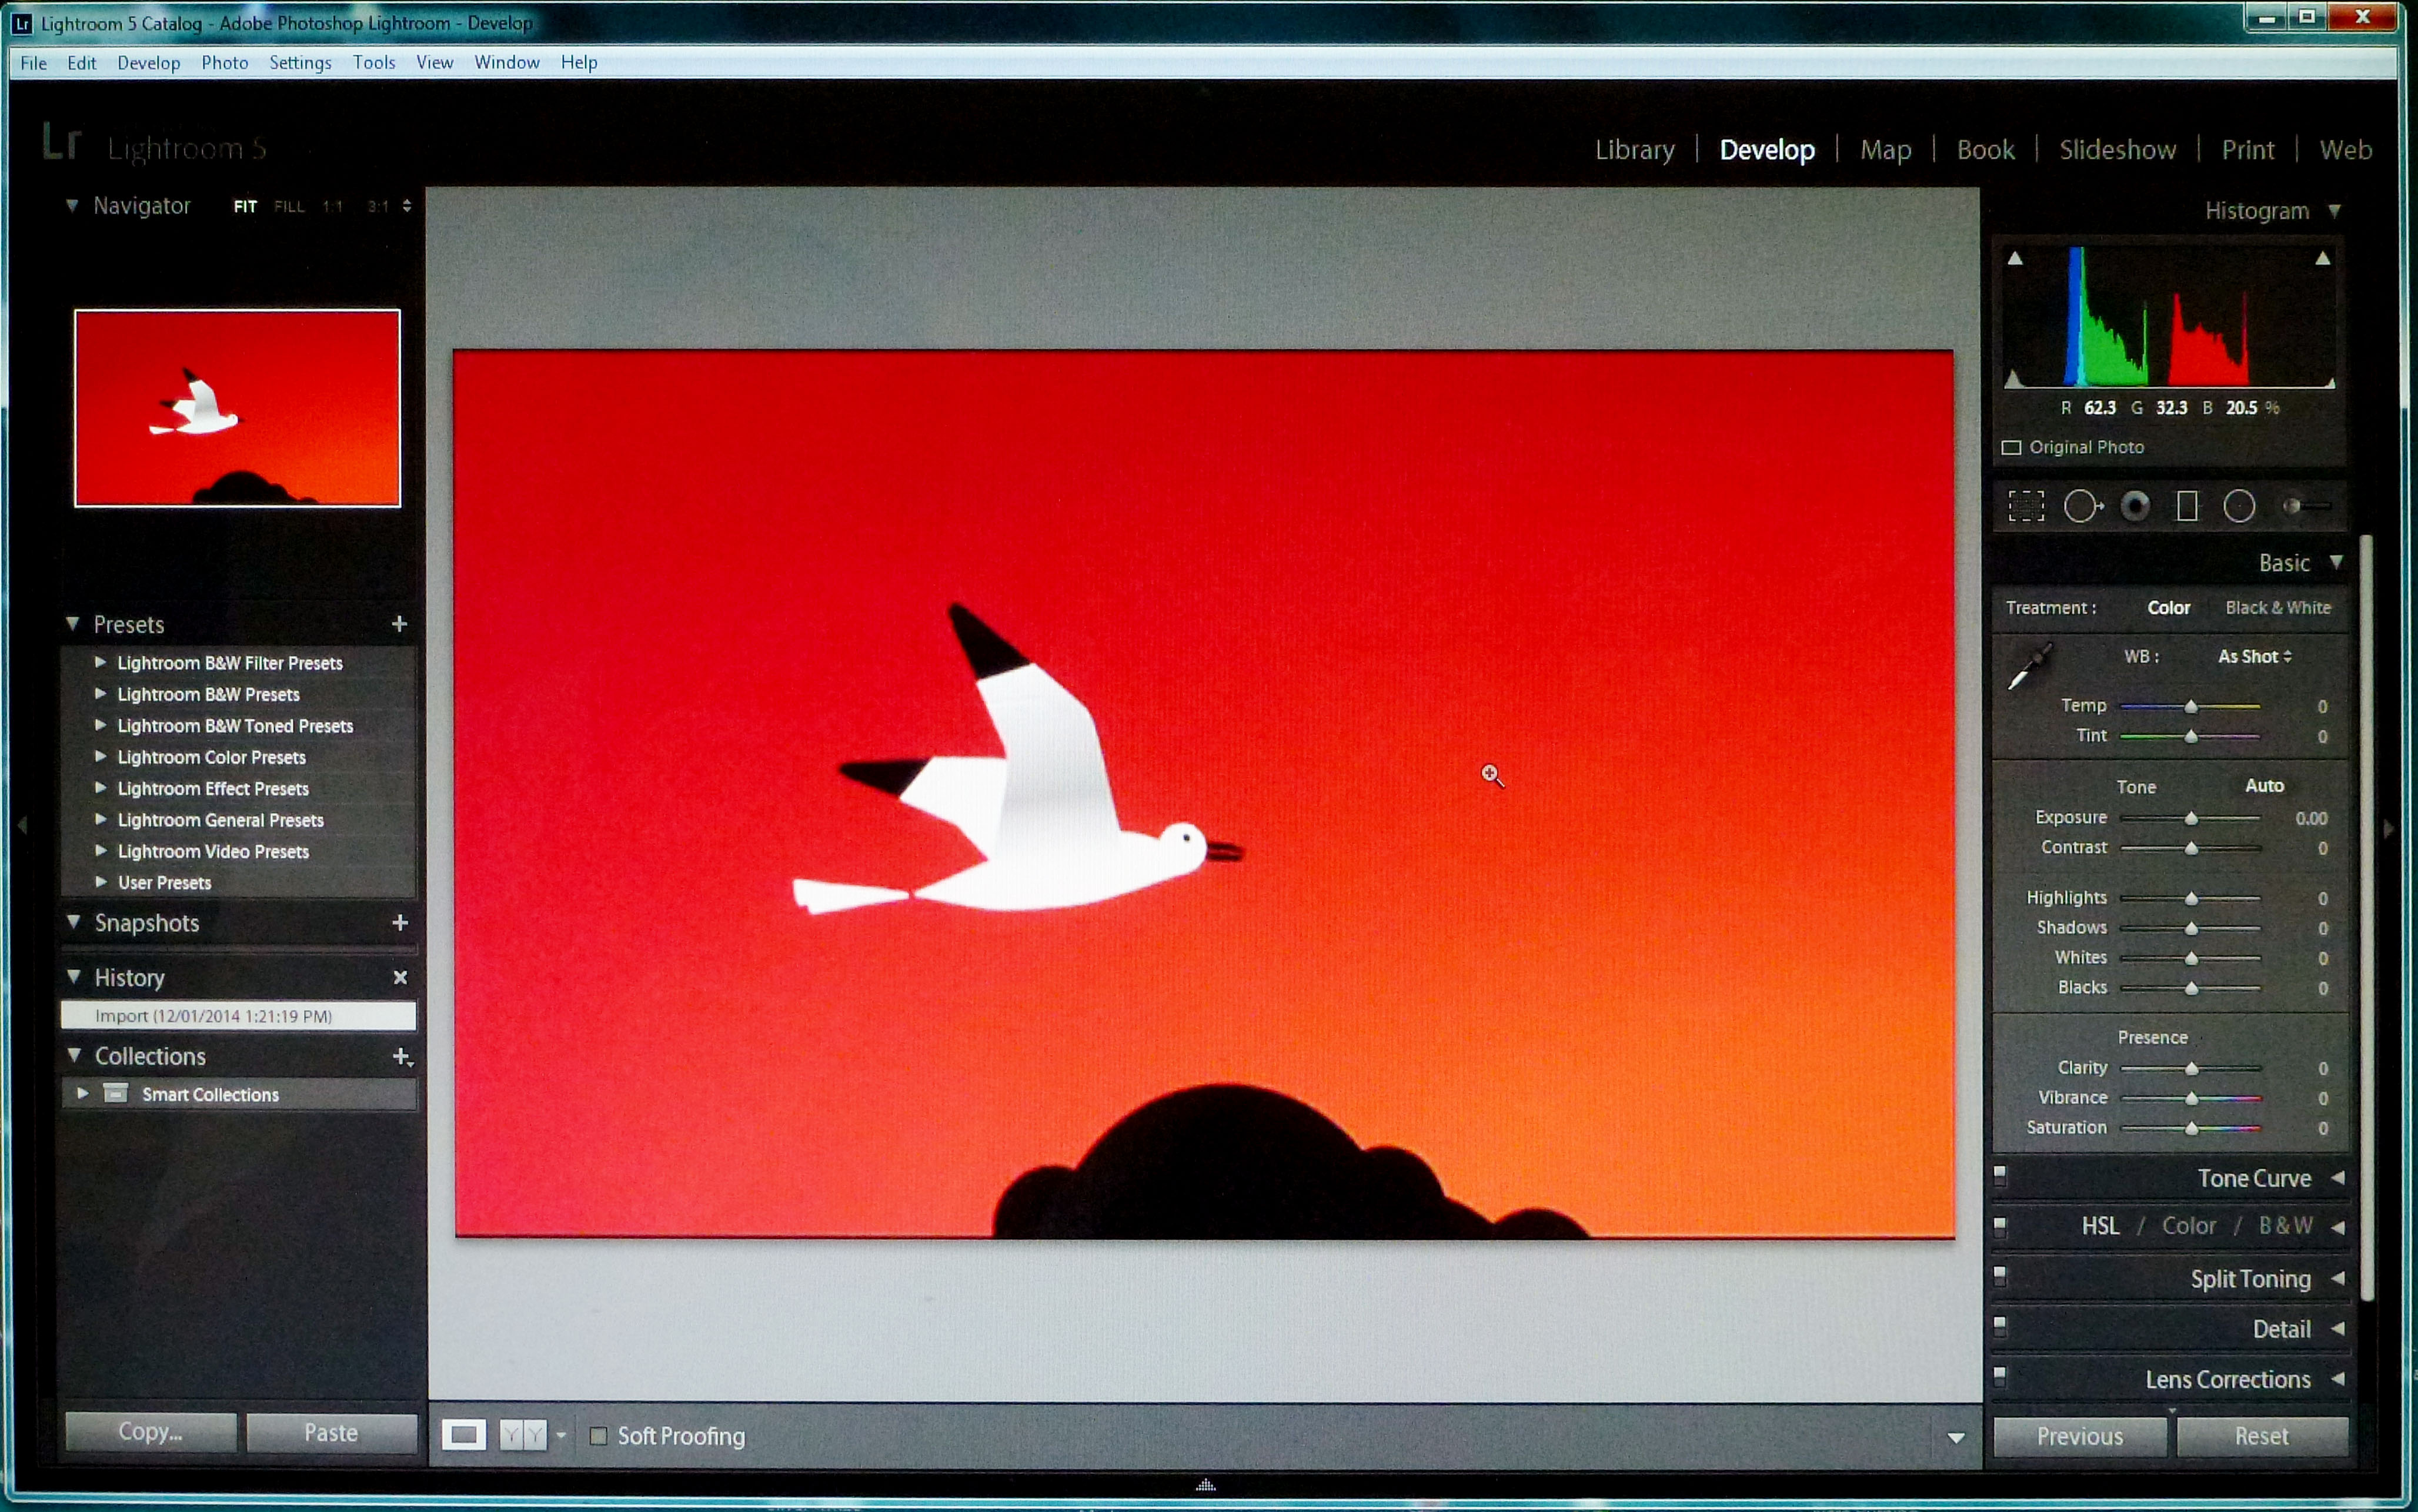
(click the image for a larger version of the Interface detail in development (editing) mode)
Adobe Lightroom: Metadata Panels.
Adobe Lightroom’s metadata panels are the engine room of its professional search tools.
Adobe Lightroom uses the industry standard IPTC system for tagging photos with keywords, captions, descriptions and more as ‘metadata’ – or data embedded invisibly in the image but available to programs like Adobe Lightroom. It can also display the EXIF (shooting information) data embedded by your camera in every shot it takes.
Keywords are at the heart of any serious image cataloguing system. They are words or short phrases which are embedded in the photo and used later to help locate specific images. You can type in any keyword or keywords you like with one or more images selected.
Adobe Lightroom will look for similar keywords you have already used as you type, to help avoid duplication and save time. It will also display recently-used keywords you can apply with a single click, and user-defined Keyword Sets which you use often.
Keyword List: You use this panel for large-scale keyword organisation and editing. It shows all the keywords that you have used in alphabetical order, and it also allows you to organise them hierarchically.
Adobe Lightroom also shows how many images have that keyword, and you can select a keyword and click the right-facing arrow to show them. To the left of the keyword name is a checkbox – you check or uncheck this to add or remove a keyword from a selected image or images.
Metadata: This panel can display both the camera shooting (EXIF) data and other IPTC metadata fields, and you choose what you want to see using the pop-up menu on the panel’s title bar. For example, if you select Minimal, the panel displays just the File Name, the Rating, any Caption that you have added and a Copyright message – for example, your name.
Adobe Lightroom: the Library module to manage your images.
The Adobe Lightroom library mode offers photo management for keeping your images organised. This becomes a progressively greater challenge as your image library grows in size, and the number of different ways you want to use your images increases.
It uses industry-standard ‘metadata’ embedded in your images to help, consisting of keywords, captions, copyright information and more. It also offers quick-access Flags, Ratings and Labels and an interactive Filter Bar to help you quickly find and isolate the images you are seeking.
Folders: This is where Lightroom displays the real location of your photos on your computer or your external drive. If you move photos and folders here, you move them on your computer.
You can use Folders as your main organisational tool, though many photographers prefer to use Collections and Collection Sets instead.
Smart Collections: Smart Collections can be created and stored alongside regular Collections. You should think of them as ‘saved searches’.
The key thing to know about Smart Collections is that you cannot add or remove pictures manually – they’re chosen according to their properties, so the only way to control what appears is to change the properties (keywords, for example) of the picture.
Collections & Collection Sets: These are like ‘virtual’ folders. They are completely independent of the folders on your computer. You can create Collections for images you want to use as a portfolio, photos to show a client or as a way of bringing together pictures that share a common theme.
Deleting a photo from a Collection doesn’t delete the photo, only that particular reference to it, and you can add the same photo to many different collections – but it’s still the same photo, not a copy.
So if you apply any adjustments or effects to a photo, these will show up in all the Collections where the photo appears. Collection Sets are simply folders to help you organise your Collections.
You can nest them one within another, just like nesting folders on your computer.
Adobe Lightroom Library Module: Filter Bar:
Filter Bar: The Filter Bar appears at the top of the main window in Develop module, and it has drop-down menus to help you filter the contents of your Collections or Folders according to the image keywords, captions, location (if you use the Map tools) and more.
Filter Presets: The drop-down menu at the far right of the Filter Bar displays a list of default filter presets which you might find useful. For example, the Exposure Info preset displays the Metadata panel with the menus set up to display camera shooting information.
Adobe Lightroom Library Module: Flags, Ratings and Labels
Flags: Flags are a very quick way of picking out the images you want to be able to see all the time, your best images and those you do not want to keep seeing but that you do not want to delete either.
You can then use the Attribute panel on the Filter Bar to quickly filter your photos to show only Flagged or Flagged and Unflagged photos, for example.
Ratings: This is another way of identifying your best photos, and it enables you to sort your photos by rating, so that you see your best images first.
Labels: Labels: Labels are a simple colour-coding system you can use for your own purposes. You might use labels, for example, to highlight images that will need further editing, or perhaps as a way of distinguishing black and white and colour photos
Adobe Lightroom: the Develop module for serious photo editing. The Develop module is your main editing hub where you can take control over your photos, much as with many other software. The benefit here is that it is all integrated with your image management.
Adobe Lightroom: how to share photos in unexpected ways. Your photo sharing option. Prints, Facebook and Flickr are not the only way to share photos in Adobe Lightroom. You’ll find three more.Adobe Lightroom also offers Web Galleries, Slideshows and Books.
The Web Galleries module: follows the now-familiar Adobe Lightroom format of preset templates in the left sidebar and manual customising tools on the right.
Each Web Gallery consists of one or more index pages linked to individual photos.
Adobe Lightroom exports finished HTML files, which it can then upload directly to your web host (you will need a web hosting account and FTP upload details from your service provider).
Slideshows: are a good way to show off your images to family, friends or clients. Again, you have a choice of templates on the left, and manual controls on the right.
The Book module: has been produced in conjunction with online books publisher Blurb. There are no preset templates in the Book module. Instead, you create books manually using the panels on the right.
The Auto Layout panel will populate the book with your selected images, but if you want control over the layout of the individual pages, you’ll need to select them and use the Page panel and its drop-down layout menu to choose from a variety of single and multiple-photo layouts, some with text boxes.
The templates contain photo placeholders which may already contain a photo or, if you’ve chosen a new layout, they may be empty. You can drag photos from the Filmstrip on to these placeholders.
Generally, a great image editing and cataloging software. You will also find the cost is now comparable with Photoshop Elements but with the added features for image management.