|
Digital Photographers' Newsletter
APRIL 2012 Edition
This months summary
(items are now hot linked from summary for convenience) |
Using Your Camera's Predefined Modes
Most cameras these days come with selected modes for taking shots, eg Landscape, Cloudy Day, Full Sun, Indoors, Night.
It can be helpful to use these modes because it gives your camera a little extra information about the scene. This helps it pick the right combination of shutter speed, flash, and other exposure choices for a perfect picture.
Camera makers put a lot of thought into the settings for each of the different modes, and they tailor the settings to what will work well with their camera.
Don’t be afraid to experiment with and use the predefined scene modes of your camera. The following brief description of each mode and when to use it may assist you in using these different modes.
Landscape Mode |
 |
This mode works really well when you’re photographing a large expanse of land. The camera automatically picks a smaller aperture, giving your image more sharpness amd depth-of-Field. It’s helpful to use a tripod or prop yourself up against something when you pick this mode. The added stability will help to ensure that the image turns out as sharp as possible. |
Cloudy Day Mode |
 |
This mode was designed to combat the dull colors you tend to get when you’re shooting on cloudy days. Wherever you can find color in your shots, it will be emphasized when you pick this mode. I like to try and find greens and blues when I’m shooting in this mode. These colors truly stand out. |
Full Sun Mode |
 |
You’ll want to use this mode when you’re taking pictures in the middle of the day, particularly in the summer. The camera automatically picks a faster shutter speed, allowing less light onto your image sensor. This results in a more evenly lit picture that isn’t too bright. |
Incandescent Mode |
 |
There are two kinds of indoor lighting situations. Incandescent mode is designed for pictures taken indoors under ordinary lightbulbs. As you are probably aware, most of these bulbs produce an orangish glow that can make your pictures look a little strange. When you pick incandescent mode, your camera removes the orange tinge, and your photos look much more natural. You may however find the creative effect of the tone enhancing for low-light photography. Some of the most attractive weddings photos can be taken using this lighting. You may have to flash-fill to retain the facial colours however. |
Fluorescent Mode |
 |
You’ll want to pick this mode when you’re shooting under fluorescent office lights (shopping centres and shops) . These lights tend to create a greenish/bluish tinge when you aren’t shooting in the right mode. Just like incandescent mode, your camera will compensate for this by creating an image that has no strange color distortions. It is in effect modifying your white point setting. |
Night Mode |
 |
You’ll need to hold your camera still for this one. The night mode (also known as the “night portrait mode”) uses the camera’s flash to take a portrait. It also keeps the shutter open a little longer, allowing some of the light from the background to make its way into the shot. This can give you beautiful cityscapes with natiral light portraits and close foregrounds. |
Sports Mode |
 |
This is a mode you’ll want to use when you’re taking action shots outdoors. Your camera will pick a very fast shutter speed so it can freeze action in an instant. Be aware that this mode doesn’t do so well in poorly lit spaces. If you are photographing an indoor sport, the pictures are likely to turn out dark. In this case you are better to preselect a speed and increase your ISO setting to give you an acceptable exposure. |
Macro Mode |
 |
This is the mode you’ll use to take pictures of flowers and bugs. Get up really close to your subject when you use this mode, and really do your best to fill the frame. The camera will automatically pick the best lighting settings for these up close shots. All you need to do is find something interesting to photograph. |
Some cameras have even more modes than this and you will probably find reference to them in your camera manual.
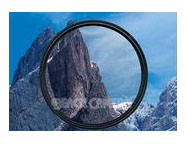
The Pros and Cons of Ultra-Violet and Skylight Filters.
The use of a ulta-violet (UV) or skylight filter on your camera lens is mainly for protection of the lens which is very expensive to replace. Any scratches from cleaning or camera bumps will be taken on the filter which is relatively cheap to replace.
(you don't need this type of
break on your lens proper)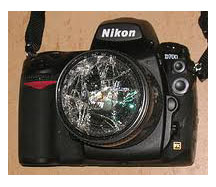
Years ago when using black & white film UV filters were used to 'cut through' smog and haze. The contrast of the negative was thus enhanced. When colour film came along the Skylight filters came into use. They have pink, yellow, or orange tone creating a a warm tone to your photos and also taking a bite out of your blue skies. This may or may not be what you want. UV filters are clear and generally will remove haze only without affecting color.
Both types of filter will protect your lens and give benefites of haze reduction. Remember when you see haze over the city your camers will see it also and record it even more.
 Most compact cameras do not require this added lens protection as they have a automatic lens cover action on powering down. Most compact cameras do not require this added lens protection as they have a automatic lens cover action on powering down.
In my excperience ALL single lens reflex (SLR) lenses should be fitted with a filter to protect the front 'glass'. One accident will pay for it times over!
|
|
FREE -Photography BASIC NOTES
If you would like a FREE copy of my Basic notes please email request with Subject "Basic Notes". See details

|
LATEST TIPs for Digital Photographers gives you advice on How to Use your Digital Camera. Gives you a kick-start to using your camera. This has been shared FREE to our Network members.
Available TIPs:
TDP-0005
How to use your Digital Camera
TDP-0004
Photographing Motor Sports
TDP-0003
Capturing Movement with Shutter Speed
TDP-0002
Commonsense Colour Management
TDP-0001
Relationship of Shutter Speed and Aperture
If you would like a copy of any of these or to receive my regular TIPs please send me an email and I will place your contact on my email network group.
Samples of TIPS can be found in past Newsletters (see left column this Newsletter)
Brisbane Seminars in the Library
Our popular monthly Seminars on BASIC digital photography are held on the third Thursday of every month at the Everton Park Library, BRISBANE
from 6-7.45pm.
APRIL seminar will be THURSDAY 19th
This month's Seminar will include discussions on digital photography, Digital Photography TIPs, and general discussion. ALL welcome
These Seminars are FREE and are part of our studio community program with the BCC Everton Park Library.
Bookings are essential
Please call the Everton Park Library on
07 3403 7400
to reserve your place.
|
Local Photographers' Email Network
You can be a member of our email network receiving these Newsletters each month and advice of library seminars and discussion groups?
Contact me to get your name on the list (FREE) and receive my regular TIPs For Digital Photographers.
Lifetime Saturday or Sunday Workshops
Our workshops are offered to assist you to learn the basics of digital photography by practical use of your camera.
By gaining a better understanding you will become more competent and creative. You will marvel at the improvement of your images and be encouraged by your newfound skills.
Next workshop will be on portraiture and people photography and will be located in Fallon Park at the rear of the Library.
Please contact me for an enrolment form.
Workshop page |
|